Ron Ben-Israel shares a step-by-step guide to make a celebration cake and a few great techniques!
Re-visiting a blog post from 2011 where Ron Ben-Israel was commissioned by Pastry & Baking to do a few “step by step” stories. This one is really fun celebration cake using “needlework” techniques. Enjoy!
Equipment list: measuring tape, parchment paper, pencil, tape, pin, colored sugar paste or Satin Ice Fondant, clay gun/extruder, paint brush, small sharp edged scissor, xacto knife and marzipan
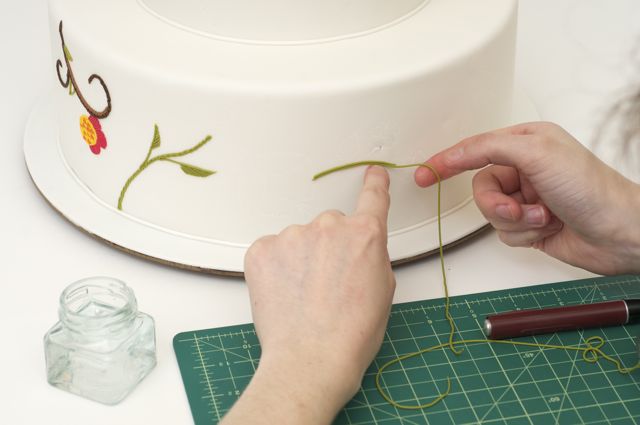
1. Using a measuring tape, note the circumference of each tier.2. Cut a long strip of parchment paper to fit the full length and height of each tier.3. Draw design on parchment template. Here we were inspired by vintage crewelwork from Turkey.4. Pin parchment template to cake and score your design. Remove parchment.5. Fill extruder/clay gun with colored sugar paste. You could use pre-colored Satin Ice Fondant or tint some Satin Ice gum paste.6. Use these 4 techniques to achieve embroidery effects on the cake surfaces – use one or a combination of all four.7a. Split Stitch – adhere two noodle strips to the scored lines on the cake, using a fine brush, moisten the back with water.7b. Using a pair of small sharp edged scissors, snip into the paste noodles.8. Straight Stitch: – apply one noodle strip and cut in the same fashion for a split stitch.9. Satin Stitch – moisten area with water using your paintbrush, apply noodle strip in one direction and cut with xacto knife.10. French Dot – roll small balls of paste; moisten the back with water, and using a toothpick apply to the cake. Add a little pressure with the toothpick to mark a hole in the center of each ball.11. Finish cake with confectionary cherries (can be made out of marzipan, sugar paste or Satin Ice Fondant).